
Creating a Trading Bot with a Hedged Grid Strategy
1. What is a Hedged Grid Strategy?
The Hedged Grid strategy is an advanced automated trading approach that blends a classic grid with reverse-grid hedging. It starts with a traditional grid after an entry signal, placing buy and sell orders at defined intervals. If price retraces beyond a predefined level (“Hedge Trigger”), the bot opens a secondary hedge grid to help cover risk and protect the original position. This hybrid method aims to benefit from market volatility while limiting adverse movement through hedging.
2. Creating a New Bot
In this section, we'll walk through step-by-step how to configure your Hedged Grid bot based on your trading goals.
2.1 Starting a New Bot Configuration
- Log in to your FX eTrader account.
- From the dashboard, click on “Create New Bot.”
- Select “Hedged Grid” as your Grid Type in the strategy selector.

2.2 Customizing Your Bot's Parameters
The Hedged Grid bot configuration includes three major setup steps: Grid Setup, Trade Management, and Entry Rules (with optional exit rules). These are laid out in the Bot Configuration Panel as you fill in the form fields.
2.3 Saving and Building Your Bot
After customizing all parameters, review your settings for accuracy and alignment with your risk tolerance. When ready, input a unique Bot Name at the bottom of the form, then click the “Build the Bot” button to generate your EA file.
3. Step (1): Grid Setup
This section defines how your grid and hedge triggers behave in the market.
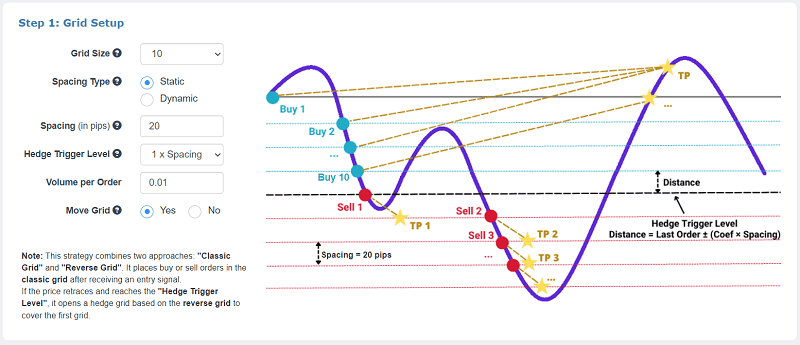
3.1 Grid Size
Defines the number of grid levels (orders) the bot will place. More levels means more potential trade entries and coverage but increases required margin.
3.2 Spacing Type & Spacing
Spacing Type: Select Static or Dynamic spacing.
- Static: Fixed pip distance between grid levels.
- Dynamic: Spacing based on ATR (Average True Range) multipliers.
Spacing (in pips): The distance between successive grid orders. Smaller spacing can capture tighter price fluctuations; larger spacing is suited for broader market swings.
3.3 Hedge Trigger Level
This parameter sets the retracement level (in multiples of grid spacing) that must be reached before the hedge grid activates. This determines how sensitive your hedging logic is to adverse price movement.
3.4 Volume per Order
Defines the trade size (lot size) for each grid order. Smaller lots reduce risk per order but require more trades for profit.
3.5 Move Grid
Select “Yes” if you want the bot to let the grid shift with market movement, helping adapt to trending conditions. “No” keeps the grid anchored to the original reference price.
4. Step (2): Trade Management
This step defines how profits are captured and how risk is controlled once the grid operates.
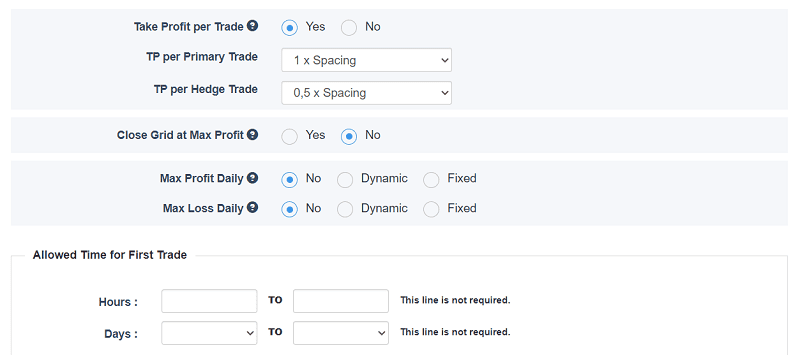
4.1 Take Profit per Trade
Enable this to set a profit target for individual trades. You may express this as a multiple of grid spacing.
4.2 TP per Hedge Trade
Separately define a take profit level for positions opened as part of the hedge grid. This helps manage the exit of hedge orders.
4.3 Close Grid at Max Profit
When enabled, the bot will close all grid trades once a cumulative profit level (expressed in multiples of spacing) is reached.
4.4 Daily Profit & Loss Limits
Max Profit Daily: Set a daily profit target (in % or fixed amount) that, once reached, stops further trading for the day.
Max Loss Daily: Define how much loss per day you'll tolerate before the bot pauses trading.
4.5 Allowed Time for First Trade
Specifies specific hours and days when the bot is allowed to make the first trade of a new grid. This can help align trading activity with market sessions you prefer.
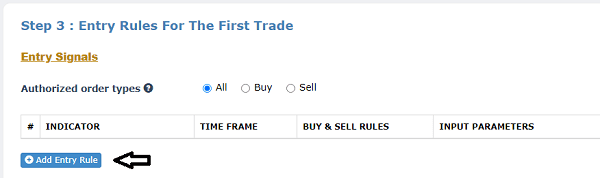
5. Step (3): Entry Rules For The First Trade
5.1 Authorized Order Types
Choose whether the bot can open Buy, Sell, or Both types of orders for initiating the grid.

5.2 Entry Signals
You must define at least one technical indicator or rule that the bot uses to determine when to initiate the first trade. Common signals include moving average crossovers, RSI levels, etc.
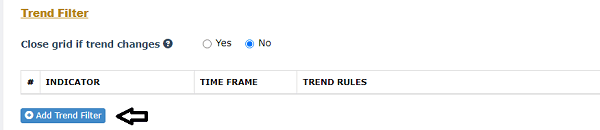
5.3 Trend Filter (Optional)
Add a trend filter to ensure entry occurs only when the market trend aligns with your signal. Optionally choose to close orders if the trend changes.
5.4 Exit Rules (Optional)
Exit Rules allow you to define trade exit conditions using technical indicators, in addition to the default take profit and stop loss settings.
These optional rules enable you to set custom exit logic for each trade. When an exit signal is triggered, the bot closes only profitable trades, meaning trades with a positive profit, while leaving losing trades open.
This approach provides greater control over trade exits and can help maximize profits while improving overall position management.

- Close on Opposite Signal: Close a trade when the entry signal reverses. For example, if your bot entered on a bullish signal, it will close the trade when a bearish signal appears.
- Close After X Bars: Automatically close trades after a specified number of candlesticks (bars) have passed. This is useful for short-term strategies.
6. Generating, Downloading, and Installing Your Bot
6.1 Generating Your EA
Once all parameters are set, click “Build the Bot” to generate an EA file. This file automates your Hedged Grid strategy on MetaTrader.
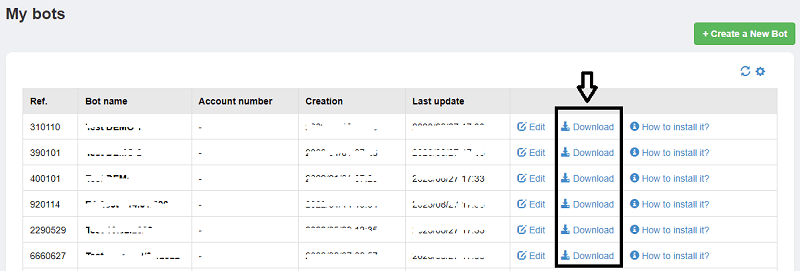
6.2 Downloading Your Bot
After the bot is built, a download link appears. Save the EA (.ex4 / .ex5) file to your machine.
6.3 Installing on MetaTrader
To install:
- Open MetaTrader and choose File → Open Data Folder.
- Navigate to MQL4/MQL5 → Experts and paste the downloaded EA file.
- Restart MetaTrader.
6.4 Activating the Bot
In MetaTrader's Navigator panel, find the EA under “Expert Advisors” and drag it onto the chart of the instrument you want to trade. Enable automated trading if prompted.